How To Make Origami Magic Ball And Folding Instructions

Mini Magic Ball Origami Instructions (Video 1)


How to make an origami magic ball (Video 2)


Origami Magic Ball Folding Instructions

Origami is the Japanese art of folding paper into any number of different shapes. An origami magic ball is a sphere shape created by folding a piece of paper. It is called a "magic" ball because when you pick it up and handle it, the sphere changes shape. For example, turning the ball inside out results in a mushroom shape. This is an advanced origami project. Although skilled folders can use smaller size paper, someone attempting the origami magic ball for the first time should use a larger and rectangular piece of paper that is twice as long as it is wide.

The origami magic ball is one of the more complex origami forms. Although very time consuming, the result is a beautiful, layered ball and an exciting challenge for experienced crafters. The origami magic ball is a foldable ornament, that the maker can transform from a ball shape into a tube by pushing gently. There are a two different ways to fold the origami magic ball, the traditional method and the quicker method.

Tutorial of how to quickly make and Origami Magic Ball! Get a piece of 20x40cm paper. Fold along side in 32 equal parts, by repeatedly folding the paper in half - using genderless folds. Fold the short side in 8 equal parts- using valley folds. Turn the sheet over and start diagonal folds - using valley folds into 32 parts. Roll paper out flat, and fold it zigzag following previously made genderless folds. At corner of paper, create a "water bomb" by pressing together previously made folds forming indents in the paper. Add another water bomb next to the first one, etc until one row is done. Proceed onto next row of water bombs, and do water bombs for every row on the paper. Tape opposite sides of the paper together, forming a ball. Follow these instructions and you too can have your very own Origami Magic Ball!

Traditional Method

The traditional method is best for those who want to make the original magic ball. Start by folding the paper into 16 by 32 equal-sized squares, using mountain folds, where the paper folds behind itself. On the first row of the long side, fold two diagonal valley folds, where the paper folds toward itself, in every 2 by 2 box square, creating the appearance of crosses. In the second row, the full crosses start from the second square with just a half cross in the first square. Repeat this alternating pattern across the sheet of paper. When finished, crumple the paper to interlock the folds. Tape the two short sides together and fold in the top and bottom.

Quick Method

The quick method is ideal for those looking to spend a little less time on the magic ball. Divide a sheet of paper into 32 even sections along the long side. Form eight valley folds on the short side and 32 diagonally across the paper. Use the grid you have formed to make rows of waterbomb bases across the entire paper. Waterbomb bases involve making valley folds along the diagonals of a square and mountain folds down the center. These rows of waterbomb bases naturally interlock with each other when compressed. Apply a strip of tape to both the top and bottom and stick the two sides together to finish.

Crumpling

To allow the folds to interlock, begin by pinching the mountain folds. Push these ridges toward each other. By continuing to pinch and fold, the paper begins to take on a tube shape. When the sides are taped together, push the tube down in a ball shape or flatten the model into a doughnut.

Mini Ball

You can also use the same method as making the quick magic ball to form a mini magic ball. Using a smaller sheet of paper, reduce the number of sections to 16 by 4 and make only 16 diagonal valley folds. Then, follow the same procedure of interlocking the ball with the waterbomb bases and tape the two long sides together.

How to make an Origami Magic Ball (Video 3)


Origami magic ball diagram

Origami magic ball diagram

Origami magic ball diagram

Origami magic ball turbo flasher bowl tutorial (Video 4)

The Japanese Art of Paper Folding

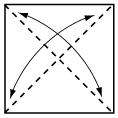
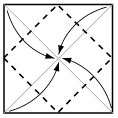
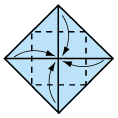
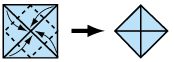
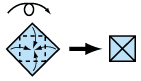
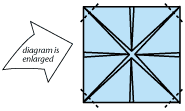
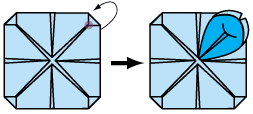
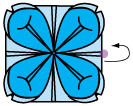
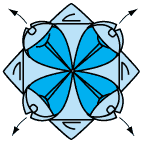
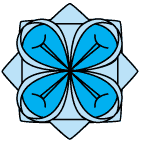
A little background on origami art: Origami is a special way of folding paper which originated in Japan. It involves the creation of forms entirely by folding paper, and you can learn how to make this particular model in just one go. If you're looking for a new hobby, give this a try! Once you get started, you'll be hooked!
The only material you need is a flat sheet of paper. You may use normal printer paper but of course, you will produce a better result if you use proper origami paper, which is a bit thinner and holds the creases better.

Origami Lotus Instructions

The beautiful origami lotus is much simpler than it looks! Make it with some special textured paper for a lovely effect. It works best with paper that is a little flexible, as step 7 (see below) can sometimes make the paper rip if it is too brittle.
For a printable pdf version of the lotus instructions, click here.
You will need Adobe Reader installed on your computer in order to open the .pdf file.

1. Start with white side up. Fold diagonally both ways and open.
2. Fold each corner into the centre.
3. Fold each corner into the centre once again.
4. For a third time, fold each corner into the centre.
5. Turn model over and fold each corner into the centre.
6. Fold each corner inwards a small amount.
7. To form the petals, press down on the point shown, while slowly pulling the petal from behind, to the front. It's almost like turning the corner "inside out". Repeat on all corners.
8. The second set of petals are formed the same way, but the corner from the point shown.
9. The third set doesn't need to be turned "inside out", just folded normally from below the first set.
Finished Lotus.